반응형

onCreate is called on initial creation of the fragment. You do your non graphical initializations here. It finishes even before the layout is inflated and the fragment is visible.


onCreateView is called to inflate the layout of the fragment i.e graphical initialization usually takes place here. It is always called some time after the onCreate method.

반응형

안드로이드에서 레트로핏을 활용해 서버와 통신하는데 String 데이터를 주고받는 경우

다음과 같이 따옴표가 포함되어 전송되는 문제가 발생했다.


알고보니 이 문제는 레트로핏 서비스 인터페이스 작성시에 multipart를 이용하여 통신하는 경우

매개변수를 RequestBody로 하지 않고 String으로 두어 따옴표가 생겨서 전송되는 것이었다.


매개변수를 RequestBody로 두고 request 메시지를 보내면 따옴표가 포함되지 않고 텍스트만 전송이 가능하다.


반응형


package com.example.mythread;

import androidx.appcompat.app.AppCompatActivity;

import android.os.Bundle;
import android.os.Handler;
import android.os.Looper;
import android.os.Message;
import android.util.Log;
import android.view.View;
import android.widget.Button;
import android.widget.TextView;

public class MainActivity extends AppCompatActivity {
    int value = 0;
    TextView textView;

    MainHandler handler = new MainHandler();
    @Override
    protected void onCreate(Bundle savedInstanceState) {
        super.onCreate(savedInstanceState);
        setContentView(R.layout.activity_main);

        Button button = findViewById(R.id.button);
        textView = findViewById(R.id.tv);

        button.setOnClickListener(new View.OnClickListener(){
            @Override
            public void onClick(View v){
                BackgroundThread thread = new BackgroundThread();
                thread.start();
            }
        });
    }


    // 새로 생긴 쓰레드가 하는 일 지정
    class BackgroundThread extends Thread{
        public void run(){
            for(int i=0; i<100; i++){
                try{
                    Thread.sleep(100);
                }catch (Exception e){
                    Log.d("Thread", "run: " + e.toString());
                }
                value += 1;
                Log.d("Thread", "value: " + value);


                // 메시지 객체를 받아와서
                Message message = handler.obtainMessage();
                Bundle bundle = new Bundle();
                bundle.putInt("value" , value);
                message.setData(bundle);

                // 메시지 큐에 sendMessege를 한다.
                handler.sendMessage(message);
            }
        }
    }


    //메인쓰레드가 한다
    class MainHandler extends Handler {
        @Override
        public void handleMessage(Message msg){
            super.handleMessage(msg);

            Bundle bundle = msg.getData();
            int value = bundle.getInt("value");
            textView.setText("value 값 " + value);
        }

    }

}


handler의 post() 메소드를 이용하여 새로만든 Runnable 객체를 전달해 주면

이 객체에 정의된 run() 메소드 내의 코드들은 메인 스레드에서 실행된다.

이 경우에 Bundle을 이용해서 데이터를 주고받지 않아도

간결하게 코드를 작성할 수 있다.

package com.example.mythread;

import androidx.appcompat.app.AppCompatActivity;

import android.os.Bundle;
import android.os.Handler;
import android.os.Looper;
import android.os.Message;
import android.util.Log;
import android.view.View;
import android.widget.Button;
import android.widget.TextView;

public class MainActivity extends AppCompatActivity {
    int value = 0;
    TextView textView;

    MainHandler handler = new MainHandler();
    @Override
    protected void onCreate(Bundle savedInstanceState) {
        super.onCreate(savedInstanceState);
        setContentView(R.layout.activity_main);

        Button button = findViewById(R.id.button);
        textView = findViewById(R.id.tv);

        button.setOnClickListener(new View.OnClickListener(){
            @Override
            public void onClick(View v){
                BackgroundThread thread = new BackgroundThread();
                thread.start();
            }
        });
    }


    // 새로 생긴 쓰레드가 하는 일 지정
    class BackgroundThread extends Thread{
        public void run(){
            for(int i=0; i<100; i++){
                try{
                    Thread.sleep(100);
                }catch (Exception e){
                    Log.d("Thread", "run: " + e.toString());
                }
                value += 1;
                Log.d("Thread", "value: " + value);


                handler.post(new Runnable() {
                    @Override
                    public void run() {
                        textView.setText("value 값: " + value);
                    }
                });
            }
        }
    }


    //메인쓰레드가 한다
    class MainHandler extends Handler {
        @Override
        public void handleMessage(Message msg){
            super.handleMessage(msg);

//            Bundle bundle = msg.getData();
//            int value = bundle.getInt("value");
//            textView.setText("value 값 " + value);
        }

    }

}


반응형

안드로이드 주요 특징 및 아키텍처 소개


안드로이드 주요 기능

애플리케이션 프레임워크를 통해 제공되는 API를 사용하여 코드 재사용성을 높이고 빠른 개발이 가능하다.

모바일 기기에 최적화된 달빅 또는 아트런타임을 제공한다.

모바일용 데이터베이스인 SQLite를 제공한다.

각종 오디오, 비디오 및 이미지 형식을 지원하고, 모바일 기기에 내장된 각종 하드웨어(블루투스, 카메라, WIFI 등)을 지원한다.

이클립스 IDE, Android Studio를 통해서 빠른 개발 환경을 제공한다.


안드로이드 구조

안드로이드 구조

안드로이드의 구조는 응용 프로그램, 응용 프로그램 프레임워크, 라이브러리, 안드로이드 런타임, 리눅스 커널으로 이루어져 있다.


1. 응용 프로그램

안드로이드 스마트폰에서 사용할 수 있는 일반적인 응용 프로그램을 말하며,

예를 들어 웹 브라우저, 달력, 구글맵, 연락처, 게임 등 사용자 입장에서 가장 많이 사용된다.

응용 프로그램은 Java로 작성된다.


2. 응용 프로그램 프레임워크

안드로이드 API가 존재하는 곳이다.

안드로이드폰 하드웨어에 접근할 때는 API를 통해서만 가능하다.


3. 안드로이드 런타임

Java 코어 라이브러리와 달빅 가상 머신 또는 아트 런타임으로 구성된다.

안드로이드는 Java 문법으로 프로그래밍하지만 Java 가상 머신을 사용하지 않고 안드로이드 런타임에 존재하는

달빅 가상 머신이나 아트 런타임을 사용한다. 그 이유는 달빅 가상 머신이나 아트 런타임이 안드로이드 환경에 최적화되어 있기 때문이다.


4. 라이브러리

안드로이드에서 사용되는 여러 시스템 라이브러리는

시스템 접근 때문에 응용 프로그램과 달리 Java가 아닌 C로 작성되어 성능이 뛰어나며 세밀한 조작이 가능하다.


5. 리눅스 커널

하드웨어 운영과 관련된 저수준의 관리 기능이 들어있다.

메모리 관리, 디바이스 드라이버, 보안 등 많은 스마트폰 장치 기능을 지원한다.

카메라, 터치스크린, GPS, 자이로스코프 ...


안드로이드 개발 환경의 구성

안드로이드 개발 환경의 구성


1. JDK (Java Development Kit)

Java 환경에서 돌아가는 프로그램을 개발하는 데 필요한 툴들을 모아놓은 소프트웨어 패키지이다.


2. SDK (Software Development Kit)

소프트웨어 개발 도구 모음이라고도 한다.

SDK는 API, IDE, 문서, 라이브러리, 코드 샘플 및 기타 유틸리티가 포함될 수 있다.

안드로이드 앱 개발에서 안드로이드 SDK는 필수 요소이다.


3. ADT (Android Development Tools)

안드로이드 개발 도구를 의미한다.


4. AVD (Android Virtual Device)

AVD는 안드로이드 에뮬레이터에서 시뮬레이션 하려는

안드로이드 스마트폰이나 태블릿 등의 기기의 특성을 정의하는 구성이다.

AVD를 활용하여 안드로이드 스마트폰 없이 안드로이드 어플리케이션을 개발할 수 있다.


안드로이드 개발 환경별 특징

안드로이드 개발 환경 별 개발 툴킷

안드로이드에서 응용 프로그램을 개발할 때는 Java 언어를 사용하며 개발 툴킷은 SDK(Software Development Kit)를 사용한다.

시스템 응용 프로그램을 개발할 때는 C, C++ 언어를 사용하며 개발 툴킷은 NDK(Native Development Kit)를 사용한다.

하드웨어를 제어하고 커널 관련한 개발을 할 때는 C, C++언어를 사용하며 PDK(Platform Development Kit)을 이용하여 개발한다.


안드로이드 앱 개발 구성 요소

안드로이드 개발 구성 요소


1. 에뮬레이터 혹은 디바이스 

안드로이드 스튜디오에서 개발한 앱을 테스트한다.


2. adb(Android Debug Bridge) 프로그램

안드로이드 스튜디오를 실행하면 자동으로 실행되어 [에뮬레이터/디바이스]와 연결을 관리한다.


3. adbd(Android Debuf Bridge Daemon) 프로그램

안드로이드 디바이스 내부에서 adb 서버와의 통신을 담당한다.


4. Run 메뉴

[안드로이드 플러그인] -> [adb 서버] -> [adbd] -> [에뮬레이터/디바이스] 로 전송되어 실행된다.


5. 디버거(Debugger)

프로그램 버그를 찾기 위한 소프트웨어 앱을 직접 사용하거나 안드로이드 스튜디오에 내장된 것을 사용한다.


반응형

레트로핏 인터페이스

package com.example.unsplash_app_tutorial.retrofit

import com.example.unsplash_app_tutorial.utils.API
import com.google.gson.JsonElement
import retrofit2.Call
import retrofit2.http.GET
import retrofit2.http.Query

interface IRetrofit {
    // https://www.unsplash.com/search/photos?query=""

    @GET(API.SEARCH_PHOTOS)
    fun searchPhotos(@Query("query") searchTerm: String) : Call<JsonElement>

    @GET(API.SEARCH_USERS)
    fun searchUsers(@Query("query") searchTerm: String) : Call<JsonElement>
}


RetrofitClient.kt

package com.example.unsplash_app_tutorial.retrofit

import android.util.Log
import com.example.unsplash_app_tutorial.utils.API
import com.example.unsplash_app_tutorial.utils.Constants.TAG
import com.example.unsplash_app_tutorial.utils.isJsonArray
import com.example.unsplash_app_tutorial.utils.isJsonObject
import com.google.gson.JsonObject
import okhttp3.Interceptor
import okhttp3.OkHttpClient
import okhttp3.Response
import okhttp3.logging.HttpLoggingInterceptor
import org.json.JSONObject
import retrofit2.Retrofit
import retrofit2.converter.gson.GsonConverterFactory
import java.lang.Exception

// 싱글턴
object RetrofitClient {
    // 레트로핏 클라이언트 선언

    private var retrofitClient: Retrofit? = null

    // 레트로핏 클라이언트 가져오기
    fun getClient(baseUrl: String): Retrofit? {
        Log.d(TAG, "RetrofitClient - getClient() called")

        // okhttp 인스턴스 생성
        val client = OkHttpClient.Builder()

        // 로그를 찍기 위해 로깅 인터셉터 추가
        val loggingInterceptor = HttpLoggingInterceptor(object : HttpLoggingInterceptor.Logger {
            override fun log(message: String) {
//                Log.d(TAG, "RetrofitClient - log() called / message: $message")

                when {
                    message.isJsonObject() ->
                        Log.d(TAG, JSONObject(message).toString(4))
                    message.isJsonArray() ->
                        Log.d(TAG, JSONObject(message).toString(4))
                    else -> {
                        try {
                            Log.d(TAG, JSONObject(message).toString(4))
                        } catch (e: Exception) {
                            Log.d(TAG, message)
                        }
                    }
                }
            }
        })

        loggingInterceptor.setLevel(HttpLoggingInterceptor.Level.BODY)

        // 위에서 설정한 로깅 인터셉터를 okhttp 클라이언트에 추가한다.
        client.addInterceptor(loggingInterceptor)

        // 기본 파라미터 인터셉터 설정
        val baseParameterInterceptor: Interceptor = (object : Interceptor {
            override fun intercept(chain: Interceptor.Chain): Response {
                Log.d(TAG, "RetrofitClient - intercept() called")
                // 오리지널 리퀘스트
                val originalRequest = chain.request()

                // 쿼리 파라미터 추가하기
                val addedUrl =
                    originalRequest.url.newBuilder().addQueryParameter("client_id", API.CLIENT_ID)
                        .build()

                val finalRequest = originalRequest.newBuilder()
                    .url(addedUrl)
                    .method(originalRequest.method, originalRequest.body)
                    .build()
                return chain.proceed(finalRequest)
            }
        })

        // 위에서 설정한 기본 파라미터 인터셉터를 okhttp 클라이언트에 추가한다.
        client.addInterceptor(baseParameterInterceptor)
        
        // 레트로핏 빌더를 통해 인스턴스 생성
        if (retrofitClient == null) {
            retrofitClient = Retrofit.Builder()
                .baseUrl(baseUrl)
                .addConverterFactory(GsonConverterFactory.create())
                // 위에서 설정한 클라이언트로 레트로핏 클라이언트를 설정한다.
                .client(client.build())
                .build()
        }
        return retrofitClient
    }
}


RetrofitManager

package com.example.unsplash_app_tutorial.retrofit

import android.util.Log
import com.example.unsplash_app_tutorial.utils.API
import com.example.unsplash_app_tutorial.utils.Constants.TAG
import com.example.unsplash_app_tutorial.utils.isJsonArray
import com.example.unsplash_app_tutorial.utils.isJsonObject
import com.google.gson.JsonObject
import okhttp3.Interceptor
import okhttp3.OkHttpClient
import okhttp3.Response
import okhttp3.logging.HttpLoggingInterceptor
import org.json.JSONObject
import retrofit2.Retrofit
import retrofit2.converter.gson.GsonConverterFactory
import java.lang.Exception
import java.util.concurrent.TimeUnit

// 싱글턴
object RetrofitClient {
    // 레트로핏 클라이언트 선언

    private var retrofitClient: Retrofit? = null

    // 레트로핏 클라이언트 가져오기
    fun getClient(baseUrl: String): Retrofit? {
        Log.d(TAG, "RetrofitClient - getClient() called")

        // okhttp 인스턴스 생성
        val client = OkHttpClient.Builder()

        // 로그를 찍기 위해 로깅 인터셉터 추가
        val loggingInterceptor = HttpLoggingInterceptor(object : HttpLoggingInterceptor.Logger {
            override fun log(message: String) {
//                Log.d(TAG, "RetrofitClient - log() called / message: $message")

                when {
                    message.isJsonObject() ->
                        Log.d(TAG, JSONObject(message).toString(4))
                    message.isJsonArray() ->
                        Log.d(TAG, JSONObject(message).toString(4))
                    else -> {
                        try {
                            Log.d(TAG, JSONObject(message).toString(4))
                        } catch (e: Exception) {
                            Log.d(TAG, message)
                        }
                    }
                }
            }
        })

        loggingInterceptor.setLevel(HttpLoggingInterceptor.Level.BODY)

        // 위에서 설정한 로깅 인터셉터를 okhttp 클라이언트에 추가한다.
        client.addInterceptor(loggingInterceptor)

        // 기본 파라미터 인터셉터 설정
        val baseParameterInterceptor: Interceptor = (object : Interceptor {
            override fun intercept(chain: Interceptor.Chain): Response {
                Log.d(TAG, "RetrofitClient - intercept() called")
                // 오리지널 리퀘스트
                val originalRequest = chain.request()

                // 쿼리 파라미터 추가하기
                val addedUrl =
                    originalRequest.url.newBuilder().addQueryParameter("client_id", API.CLIENT_ID)
                        .build()

                val finalRequest = originalRequest.newBuilder()
                    .url(addedUrl)
                    .method(originalRequest.method, originalRequest.body)
                    .build()
                return chain.proceed(finalRequest)
            }
        })

        // 위에서 설정한 기본 파라미터 인터셉터를 okhttp 클라이언트에 추가한다.
        client.addInterceptor(baseParameterInterceptor)

        // 커넥션 타임 아웃
        client.connectTimeout(10, TimeUnit.SECONDS)
        client.readTimeout(10, TimeUnit.SECONDS)
        client.writeTimeout(10, TimeUnit.SECONDS)
        client.retryOnConnectionFailure(true)

        // 레트로핏 빌더를 통해 인스턴스 생성
        if (retrofitClient == null) {
            retrofitClient = Retrofit.Builder()
                .baseUrl(baseUrl)
                .addConverterFactory(GsonConverterFactory.create())
                // 위에서 설정한 클라이언트로 레트로핏 클라이언트를 설정한다.
                .client(client.build())
                .build()
        }
        return retrofitClient
    }
}


반응형

MainActivity.kt

package com.example.mysingletonpractice

import androidx.appcompat.app.AppCompatActivity
import android.os.Bundle
import android.util.Log

class MainActivity : AppCompatActivity() {
    val TAG: String = "로그"
    override fun onCreate(savedInstanceState: Bundle?) {
        super.onCreate(savedInstanceState)
        setContentView(R.layout.activity_main)
        Log.d(TAG, "MainActivity - onCreate() called")

        val myNormalClass_1 = MyNormalClass()
        val myNormalClass_2 = MyNormalClass()
        
        Log.d(TAG, "MainActivity myNormalClass_1 : $myNormalClass_1")
        Log.d(TAG, "MainActivity myNormalClass_2 : $myNormalClass_2")

        val mySingleTonClass_1 = MySingletonClass
        val mySingleTonClass_2 = MySingletonClass

        Log.d(TAG, "MainActivity - val mySingleTonClass_1 = $mySingleTonClass_1")
        Log.d(TAG, "MainActivity - val mySingleTonClass_2 = $mySingleTonClass_2")
        
        val mySQLOpenHelper_1 = MySQLOpenHelper(this)
        val mySQLOpenHelper_2 = MySQLOpenHelper(this)
        
        Log.d(TAG, "MainActivity - mySQLOpenHelper_1 : $mySQLOpenHelper_1")
        Log.d(TAG, "MainActivity - mySQLOpenHelper_2 : $mySQLOpenHelper_2")


        val MySQLOpenHelperSingleton_1 = MySQLOpenHelperSingleton.getInstance(this)
        val MySQLOpenHelperSingleton_2 = MySQLOpenHelperSingleton.getInstance(this)

        Log.d(TAG, "MainActivity - MySQLOpenHelperSingleton_1 : $MySQLOpenHelperSingleton_1")
        Log.d(TAG, "MainActivity - MySQLOpenHelperSingleton_2 : $MySQLOpenHelperSingleton_2")


    }
}


MySQLOpenHelperSingleton

package com.example.mysingletonpractice

import android.content.Context
import android.database.sqlite.SQLiteDatabase
import android.database.sqlite.SQLiteOpenHelper

class MySQLOpenHelperSingleton private constructor(context: Context) : SQLiteOpenHelper(context, "MyDB", null, 1) {
    val TAG = "MySQLOpenHelperSingleton"

    companion object{
        // 자기 자신 변수 선언
        @Volatile private var instance: MySQLOpenHelperSingleton? = null

        // 자기 자신 가져오기
        fun getInstance(context: Context) : MySQLOpenHelperSingleton =
            instance ?: synchronized(this){
                instance ?: MySQLOpenHelperSingleton(context).also{
                    instance = it
                }
            }
    }


    override fun onCreate(p0: SQLiteDatabase?) {
        TODO("Not yet implemented")
    }

    override fun onUpgrade(p0: SQLiteDatabase?, p1: Int, p2: Int) {
        TODO("Not yet implemented")
    }


}


반응형

lottie 활용해서 좋아요 버튼 만들기


Lottie Docs


http://airbnb.io/lottie/#/android?id=animation-listeners 


Lottie Docs


airbnb.io


좋아요 애니메이션 json 파일

https://lottiefiles.com/89777-like


lottie를 활용하려면 우선 build.gradle에 dependency에 lottie를 추가해주어야 한다.

dependencies {
    implementation "com.airbnb.android:lottie:5.2.0"
}


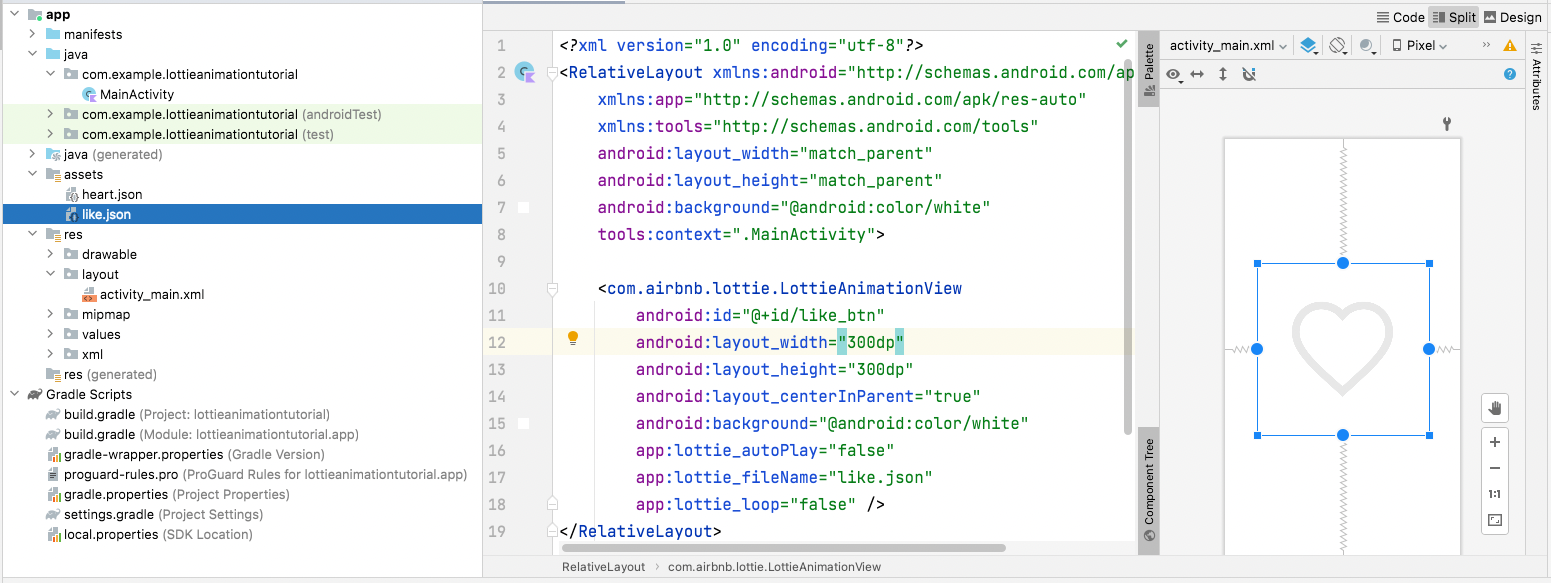
그리고 app 디렉토리에 assets 폴더를 만들고

다운로드 받은 lottie json 파일을 추가한다.

그리고 추가할 xml 파일에 LottieAnimationView를 추가하고

lottie_fileName에 다운로드 받은 로티 파일의 이름을 추가하면 xml에 로티파일을 추가할 수 있다.


로티 애니메이션을 커스텀 하려면 다음과 같은 방식으로 설정할 수 있다.

ofFloat는 애니메이션 전체의 어떤 부분을 보여줄 것인지 정할 수 있고

setDuration은 정한 부분을 몇초 동안 보여줄 것인지 정할 수 있다.

1초는 1000이다.

val animator = ValueAnimator.ofFloat(0f, 0.5f).setDuration(1000)
animator.addUpdateListener { animation : ValueAnimator ->
    like_btn.setProgress(
        animation.getAnimatedValue() as Float
    )
}
animator.start()


전체코드


activity_main.xml

<?xml version="1.0" encoding="utf-8"?>
<RelativeLayout xmlns:android="http://schemas.android.com/apk/res/android"
    xmlns:app="http://schemas.android.com/apk/res-auto"
    xmlns:tools="http://schemas.android.com/tools"
    android:layout_width="match_parent"
    android:layout_height="match_parent"
    android:background="@android:color/white"
    tools:context=".MainActivity">

    <com.airbnb.lottie.LottieAnimationView
        android:id="@+id/like_btn"
        android:layout_width="300dp"
        android:layout_height="300dp"
        android:layout_centerInParent="true"
        android:background="@android:color/white"
        app:lottie_autoPlay="false"
        app:lottie_fileName="like.json"
        app:lottie_loop="false" />
</RelativeLayout>


MainActivity.kt

package com.example.lottieanimationtutorial

import android.animation.ValueAnimator
import androidx.appcompat.app.AppCompatActivity
import android.os.Bundle
import android.util.Log
import com.example.lottieanimationtutorial.databinding.ActivityMainBinding
import kotlinx.android.synthetic.main.activity_main.*

class MainActivity : AppCompatActivity() {
    val TAG = "MainActivity"

    var isLiked: Boolean = false
    override fun onCreate(savedInstanceState: Bundle?) {
        super.onCreate(savedInstanceState)
        setContentView(R.layout.activity_main)

        isLiked = false
        //좋아요 버튼에 클릭 리스너를 달아준다.
        like_btn.setOnClickListener {
            if(isLiked == false){
                val animator = ValueAnimator.ofFloat(0f, 0.5f).setDuration(1000)
                animator.addUpdateListener { animation : ValueAnimator ->
                    like_btn.setProgress(
                        animation.getAnimatedValue() as Float
                    )
                }
                animator.start()
                isLiked = true
            }else{ // 좋아요 상태일 때
                val animator = ValueAnimator.ofFloat(0.5f, 1f).setDuration(1000)
                animator.addUpdateListener { animation : ValueAnimator ->
                    like_btn.setProgress(
                        animation.getAnimatedValue() as Float
                    )
                }
                animator.start()
                isLiked = false
            }
        }

    }
}
반응형

안드로이드 레이아웃 종류

안드로이드에서 자주 쓰는 레이아웃은 크게 3개가 존재한다.

LinearLayout, RelativeLayout,  ConstraintLayout이 있다.


LinearLayout은 horizontal이나 vertical 설정으로 편하게 레이아웃을 구성할 수 있다.

weightSum을 이용하면 웹의 css에서 flex와 같은 역할을 할 수 있다.


RelativeLayout은 뷰 id를 통해서 상대적 위치를 기준으로 뷰의 위치를 정해줄 수 있다.

또한 RelativeLayout을 이용하면 뷰를 겹쳐서 둘 수 있다.


ConstraintLayout은 앵커를 3개 두어 위치를 유동적으로 설정할 수 있다.


1. LinearLayout

<?xml version="1.0" encoding="utf-8"?>
<LinearLayout xmlns:android="http://schemas.android.com/apk/res/android"
    xmlns:app="http://schemas.android.com/apk/res-auto"
    xmlns:tools="http://schemas.android.com/tools"
    android:layout_width="match_parent"
    android:layout_height="match_parent"
    tools:context=".MainActivity"
    android:orientation="horizontal"
    android:weightSum="3"
    android:gravity="center_vertical"
    >

    <View
        android:layout_weight="1"
        android:layout_width="0dp"
        android:layout_height="50dp"
        android:background="#FF0000"
        />
    <View
        android:layout_weight="1"
        android:layout_width="0dp"
        android:layout_height="50dp"
        android:background="#FFF200"
        />
    <View
        android:layout_weight="1"
        android:layout_width="0dp"
        android:layout_height="50dp"
        android:background="#000DFF"
        />


</LinearLayout>


2. RelativeLayout


RelativeLayout


<?xml version="1.0" encoding="utf-8"?>
<RelativeLayout xmlns:android="http://schemas.android.com/apk/res/android"
    xmlns:app="http://schemas.android.com/apk/res-auto"
    xmlns:tools="http://schemas.android.com/tools"
    android:layout_width="match_parent"
    android:layout_height="match_parent"
    tools:context=".RelativeLayout">

    <View
        android:layout_width="match_parent"
        android:layout_height="100dp"
        android:background="#FF8F00"
        />


    <View
        android:id="@+id/blue_view"
        android:layout_alignParentLeft="true"
        android:layout_width="50dp"
        android:layout_height="50dp"
        android:background="@color/design_default_color_primary"
        />

    <View
        android:id="@+id/green_view"
        android:layout_width="50dp"
        android:layout_height="50dp"
        android:background="#FD62FF00"
        android:layout_toRightOf="@+id/blue_view"
        />

</RelativeLayout>


3. ConstraintLayout


ConstraintLayout

<?xml version="1.0" encoding="utf-8"?>
<androidx.constraintlayout.widget.ConstraintLayout xmlns:android="http://schemas.android.com/apk/res/android"
    xmlns:app="http://schemas.android.com/apk/res-auto"
    xmlns:tools="http://schemas.android.com/tools"
    android:layout_width="match_parent"
    android:layout_height="match_parent"
    tools:context=".ConstraintLayout">

    <View
        android:id="@+id/orange_view"
        app:layout_constraintStart_toStartOf="parent"
        app:layout_constraintEnd_toEndOf="parent"
        app:layout_constraintTop_toTopOf="parent"
        android:layout_width="50dp"
        android:layout_height="50dp"
        android:background="#F9A825"
        />
    <View
        android:id="@+id/blue_view"
        app:layout_constraintStart_toStartOf="parent"
        app:layout_constraintEnd_toEndOf="parent"
        app:layout_constraintTop_toBottomOf="@id/orange_view"
        android:layout_width="50dp"
        android:layout_height="50dp"
        android:background="#1984FF"
        />

    <View
        android:id="@+id/pink_view"
        android:layout_width="50dp"
        android:layout_height="50dp"
        android:background="#FD18F2"
        app:layout_constraintTop_toBottomOf="@id/blue_view"
        app:layout_constraintStart_toStartOf="parent"
        app:layout_constraintEnd_toEndOf="parent"
        />

    <View
        android:id="@+id/yellow_view"
        android:layout_width="50dp"
        android:layout_height="50dp"
        android:background="#FFF200"
        app:layout_constraintTop_toBottomOf="@id/pink_view"
        app:layout_constraintStart_toStartOf="parent"
        app:layout_constraintEnd_toEndOf="parent"
        />
    <View
        android:id="@+id/green_view"
        android:layout_width="50dp"
        android:layout_height="50dp"
        android:background="#27FD18"
        app:layout_constraintTop_toBottomOf="@id/yellow_view"
        app:layout_constraintStart_toStartOf="parent"
        app:layout_constraintEnd_toEndOf="parent"
        />

</androidx.constraintlayout.widget.ConstraintLayout>

+ Recent posts